Monday 11 September 2017

Helloooooo!! Today I am back with the last post (for now) relating to my Winter Release for PaperArtsy - this time concentrating on the Scandinavian Tree set and matching stencil.

These two sets really work together so well and a bonus with the stencil is that you have the cut out circle within the stencil plus you get the 'mask' circle included which means you can create all sorts of types of moons as well as using the circle stencil on its own to create either a sun or full moon.

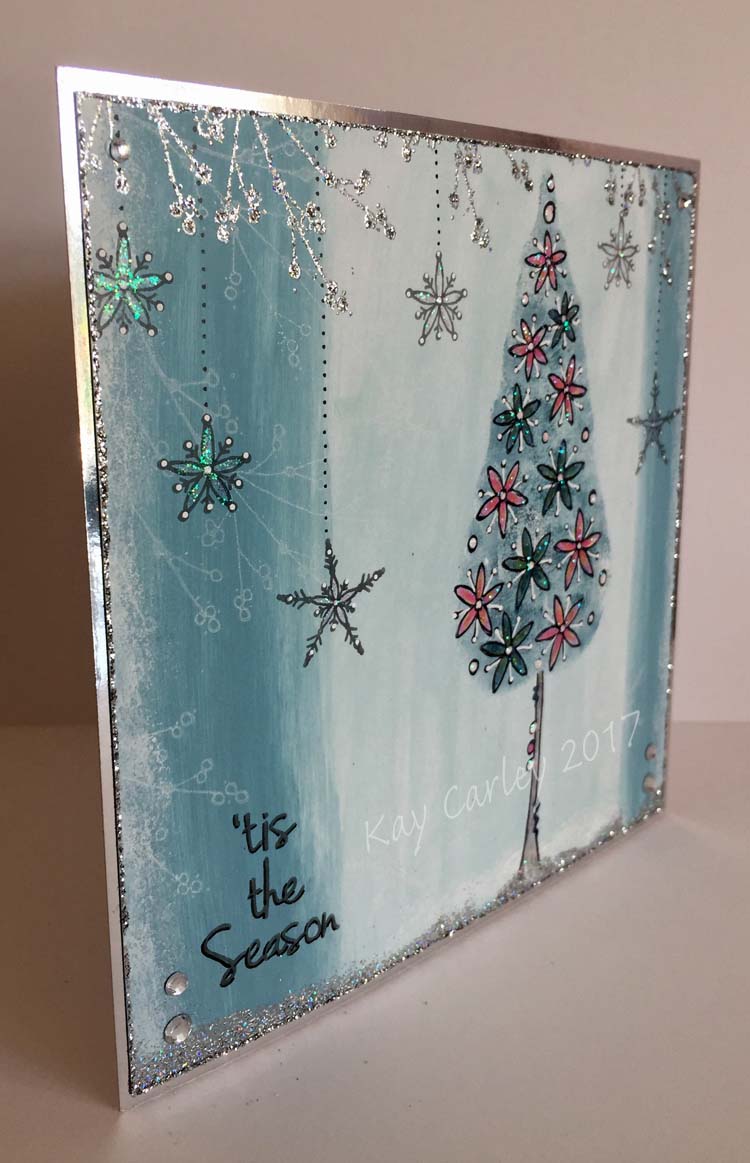
I had a particular image in my head when I designed these two products of wanting to be able to create winter landscapes with depth and dimension hence the three different sizes of trees! I also felt it was important to have a little tree, a medium sized tree and a big tree so that different sized cards could be created using the same concept as I know that some people like to create smaller cards for Christmas and others like to go for BIG statement sized cards! However don't limit yourself to just creating scenes with the trees....

Landscape Midnight Snowscene

I snaffled my Tree Blob stencil (PS069) to create the background snow on this card.
Krafty Tree 
Once again I added another stencil to this card - this time my Berry Stencil (PS067).
Simple and Quick


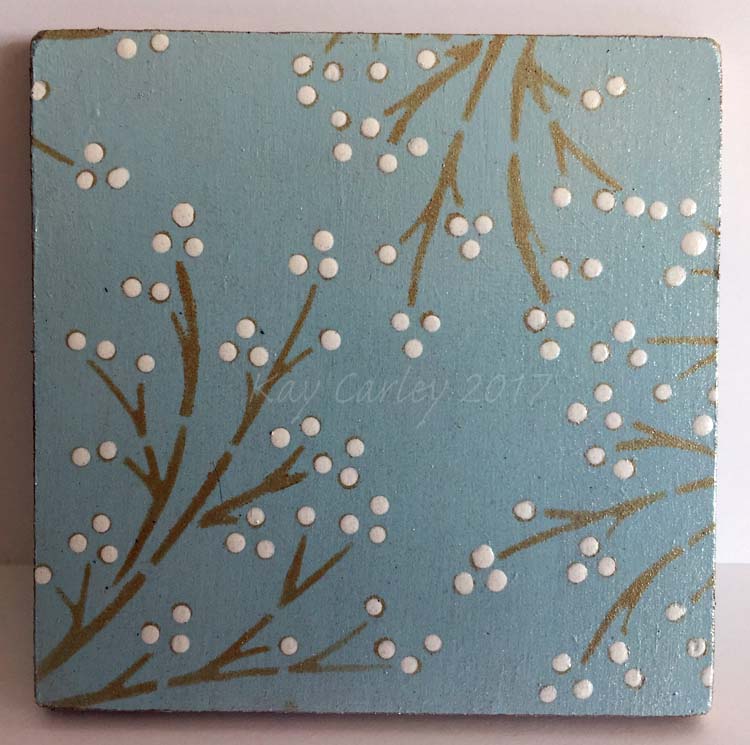
Stencilled Tree Coaster

Full Moon


I really hope you like this latest release and have fun playing with them too - if you do.....let me know as I would love to see what you create!! Meanwhile I'm off to see what else I can make with them.......I may be gone some time..............who knows!!!! See ya :)..............

Love Kay x

Blog: http://kaycarley.blogspot.co.uk
Facebook: https://www.facebook.com/kaycarley.designer/
Twitter: https://twitter.com/carleycards
Instagram: https://www.instagram.com/kay.carley/
Pinterest: https://www.pinterest.co.uk/kaycwilson1/

You can find me teaching at the following venues over the next few months:
Sept 16th - Let's Be Creative, Rogate, Petersfield, Hampshire (Foxglove Canvas)
Sept 23rd - That's Crafty, Romford, Essex (Foxglove Canvas)
Oct 7th - Country View Crafts, Potton, Sandy, Bedfordshire (Foxglove Canvas)
Oct 14th - The Forget Me Not Kraft Kabin, Rochford, Essex (Christmas Cards)
Oct 29th - The Craft Barn, Lingfield, Surrey (Christmas Cards)
Nov 18th - The Artistic Stamper, Faversham, Kent (Christmas Cards)
Nov 26th - The Craft Barn, Lingfield, Surrey (Christmas Cards)
2018 - Jan 27th - The Artistic Stamper, Faversham, Kent

If anyone is interested in me either teaching a class/workshop or demoing my products please do get in contact with me by sending me a message via my above Facebook page as I would love to hear from you :)

Sunday 10 September 2017

Hi guys!! As promised here I am again! This time to show you some samples made with stamp set EKC10 and stencil PS069.

Now I must admit that when you see the stencil on it's own it does look a bit weird! This stencil is what I call my 'tree blob' stencil. It was designed to create a background  shape for the trees as they have been perfectly sized to correspond to the co-ordinating stamps. 

Simply decide where you want your trees to go, place the stencil into position and sponge your background colour through the relevant shape then stamp your co-ordinating tree over the top :) You can also use the 'tree blobs' to create an outline for the stamped trees by taking a fine-liner pen and drawing around the shape which gives the stamped trees a totally different look! The little dots on the stencil are to represent snow - I didn't take these all the way down to make sponging through the 'tree blob shapes' easier - so to have more snow just reposition the stencil.


Snowy Trees
The background snowflakes on this card have been taken from my Snowflake stencil (PS070)

Glitter Embossed Trees


Flower Tree


Holly Trees
 I was a little bit naughty with this card as I snaffled the words from EKC09 (Holly stamp set) to use on this card as I wanted words that were in a straight line!

I really hope you like this latest release and have fun playing with them too - if you do.....let me know as I would love to see what you create!!

I'll be back tomorrow at 11am to show you a few samples that I made with EKC11.

Love Kay x

Blog: http://kaycarley.blogspot.co.uk
Facebook: https://www.facebook.com/kaycarley.designer/
Twitter: https://twitter.com/carleycards
Instagram: https://www.instagram.com/kay.carley/
Pinterest: https://www.pinterest.co.uk/kaycwilson1/

You can find me teaching at the following venues over the next few months:
Sept 16th - Let's Be Creative, Rogate, Petersfield, Hampshire (Foxglove Canvas)
Sept 23rd - That's Crafty, Romford, Essex (Foxglove Canvas)
Oct 7th - Country View Crafts, Potton, Sandy, Bedfordshire (Foxglove Canvas)
Oct 14th - The Forget Me Not Kraft Kabin, Rochford, Essex (Christmas Cards)
Oct 29th - The Craft Barn, Lingfield, Surrey (Christmas Cards)
Nov 18th - The Artistic Stamper, Faversham, Kent (Christmas Cards)
Nov 26th - The Craft Barn, Lingfield, Surrey (Christmas Cards)
2018 - Jan 27th - The Artistic Stamper, Faversham, Kent

If anyone is interested in me either teaching a class/workshop or demoing my products please do get in contact with me by sending me a message via my above Facebook page as I would love to hear from you :)

Saturday 9 September 2017

As promised I am back again to show you a few samples made with my holly stamp set along with my berry branch stencil.
  
My holly flower set has a separate holly flower head which can be used for backgrounds, borders, a smaller holly flower (just simply draw in a stem for it) as well as being useful for adding a 3D layer to the larger holly flower (see below). The berry branch stencil was really designed to go with all of the stamp sets - think about using it for backgrounds, borders etc....as well as across the top of the card to hang things from such as snowflakes etc... They are also great to stencil along the base or sides of your project to help add depth and perspective.

3D Holly Flower


Poinsettia Holly Flower!!


 Berry Coaster

Simple Holly

Snow Is Glistening


Holly Tag

Metallic Holly


I really hope you like this latest release and have fun playing with them too - if you do.....let me know as I would love to see what you create!!

I'll be back tomorrow at 11am to show you some more samples - this time with EKC10.

Love Kay x

Blog: http://kaycarley.blogspot.co.uk
Facebook: https://www.facebook.com/kaycarley.designer/
Twitter: https://twitter.com/carleycards
Instagram: https://www.instagram.com/kay.carley/
Pinterest: https://www.pinterest.co.uk/kaycwilson1/

You can find me teaching at the following venues over the next few months:
Sept 16th - Let's Be Creative, Rogate, Petersfield, Hampshire (Foxglove Canvas)
Sept 23rd - That's Crafty, Romford, Essex (Foxglove Canvas)
Oct 7th - Country View Crafts, Potton, Sandy, Bedfordshire (Foxglove Canvas)
Oct 14th - The Forget Me Not Kraft Kabin, Rochford, Essex (Christmas Cards)
Oct 29th - The Craft Barn, Lingfield, Surrey (Christmas Cards)
Nov 18th - The Artistic Stamper, Faversham, Kent (Christmas Cards)
Nov 26th - The Craft Barn, Lingfield, Surrey (Christmas Cards)
2018 - Jan 27th - The Artistic Stamper, Faversham, Kent

If anyone is interested in me either teaching a class/workshop or demoing my products please do get in contact with me by sending me a message via my above Facebook page as I would love to hear from you :)

Friday 8 September 2017

Do you wanna see what I've been up to???? Do ya though??? 

Well if you take a look below you will find a HUGE clue!!!!!!


I am very proud to announce that I have added some more stamp sets and stencils to my range under the Eclectica label by PaperArtsy. Please do head on over to PaperArtsy's blog to find out all about this release and to view some samples that I have created with these brand new products.

It turns out that when I got my hands on these new items I just couldn't stop playing with them so over the next 3 days I will share with you here all of my makes so far to give you plenty of inspiration! Plus I also have classes coming up over the next few months using these products. You can find out the dates for these and the venues under my Classes/Demos tab.

But for now please do head on over to the PaperArtsy blog to find out more about my winter release.......

I will be back tomorrow at 11am with a few samples made with my holly flower stamp sheet!

Love Kay x

Blog: http://kaycarley.blogspot.co.uk

Facebook: https://www.facebook.com/kaycarley.designer/
Twitter: https://twitter.com/carleycards
Instagram: https://www.instagram.com/kay.carley/
Pinterest: https://www.pinterest.co.uk/kaycwilson1/


Sunday 4 June 2017

New stamp and stencil!!!

Hello!!!!! Me again!!

Originally I was really excited about today as this evening sees the launch of my latest stamp set over on PaperArtsy's Blog along with a gorgeous stencil that I know I will be using lots and lots, but unfortunately my excitement has been tempered somewhat both by the recent events in London and prior to this in Manchester  :(.

But this evening my new stamp and stencil are being released so I would love it if you felt able to head on over to PaperArtsy's Blog to find out more as a lot of work goes on behind the scenes for these launches!  But just before you do..............here's a little peek!!! I have combined the new set with some of my February releases so you can see how well they will all work together :).


I SO hope you like them!! (Please do excuse my excited post on PaperArtsy's blog as this was written and scheduled before these recent atrocities happened.)

Kay xx

Facebook: https://www.facebook.com/kaycarley.designer/
Twitter: https://twitter.com/carleycards
Instagram: https://www.instagram.com/kay.carley/
Pinterest: https://uk.pinterest.com/kaycwilson1/

Thursday 1 June 2017

June Class for The Craft Barn

Oh dear...............I am just SO rubbish at finding time to blog!!

This time I am stopping by to let you know that I have an upcoming class at Lingfield Community Centre, Surrey on behalf of The Craft Barn where we will making this 12x12 Chipboard Wall Art using a combination of my new stamps and stencils along with other PaperArtsy goodies!!


For more details on how to book please click here. It would be fab if you could join me :)..........

Meanwhile I will be back this Sunday at 7pm for an exciting announcement...................well............I think it's 'exciting'!!!!!

Kay xx

Facebook: https://www.facebook.com/kaycarley.designer/
Twitter: https://twitter.com/carleycards
Instagram: https://www.instagram.com/kay.carley/
Pinterest: https://uk.pinterest.com/kaycwilson1/

Friday 10 March 2017

PaperArtsy's Infusions with Paint

Hi everyone :)!

Just stopping by to let you know that I have done a little step by step project over on PaperArtsy's blog tonight combining the fabulous Infusions powders with Chalk Fresco Finish paint.

Here's a little peek!!


To see the finished piece please do head on over to the PaperArtsy Blog :)

Love Kay xx

Facebook: https://www.facebook.com/kaycarley.designer/
Twitter: https://twitter.com/carleycards
Instagram: https://www.instagram.com/kay.carley/
Pinterest: https://uk.pinterest.com/kaycwilson1/

Saturday 25 February 2017

Beautiful Buddleia

Hi guys. I'm back today with a more detailed step out of the card that I showed over on PaperArtsy's blog on my launch night a few days ago. This particular card was made using my new EKC05 stamp set.


As I've already mentioned previously over on PaperArtsy's blog these flowers are based loosely on buddleia although they can be anything you want them to be! I have added spriggy type leaves - one of which has a long stem so that it can be 'dangled' if you so wish plus you can add the smaller sprig to the stem to make it bushier, as well as using each of them individually. Then we have got two larger style of leaves which can be stamped onto the stems of the flowers (as well as that smaller sprig of leaves) or instead you can stamp the swirly bits onto the stems or even have both together! It's all about giving you choices so that you can make a variety of different looking compositions all from one interactive stamp set. As for those tiny flowers - I've put those on the sheet so that you can change the shape of the flower heads if you so wish simply by stamping more of those little flowers around or into the large flower heads, or they can be stamped onto a separate piece of card, cut out and mounted onto the large flower heads to add dimension or can just be added into the background as I've done with this card. Hopefully once you start playing you'll see that there are lots of different possibilities!!

 Step One (Above): Apply Chalk Fresco Finish all over a 7x7" Smoothy Card panel using a sponge wedge then sponge Lavender and Pixie Dust Fresco Finish around the edges and blend with Chalk Fresco Finish.

 Step Two (Above): Work out where you want to stamp both of the large flower heads then sponge Lavender, Pixie Dust and South Pacific Fresco Finish paints onto the panel to create loose flower head shapes.

 Step Three (Above):  With Jet Black Archival stamp the flowers, leaves and swirls making use of being able to bend and manipulate those flower head stems on the acrylic block before stamping them out! Sponge some off-cut pieces of Smoothy Card with Chalk Fresco Finish before stamping out some butterflies and leaves.

 Step Four (Above): Paint all the stamped imagery using Lavender, Pixie Dust, Sugar Plum, South Pacific, Haystack, Tinned Peas and Inky Pool Fresco Finish paints. Cut out those extra leaves and butterflies. After painting all the imagery I reassessed my background and added some diluted Tinned Peas Fresco Finish paint around the stamped imagery and around the edges of the panel.

Step Five (Above): Paint a wiggly panel with Chalk Fresco Finish paint making it big enough for the words to 'sit on'. Heat set then stamp the words in Jet Black Archival and paint over the letters with watered down Fresco Finish paints - choosing colours already used on the panel.

Step Six (Above): Stamp and emboss the spriggy style of leaves and tiny flowers using VersaMark and Crystal embossing powder. Lightly paint the imagery using diluted Lavender, Tinned Peas and Chalk Fresco Finish paints.

Step Seven (Above): Paint the little flowers in the large flower heads with Pearl Glaze Fresco Finish.

A closer look - you can just make out the pearly shimmer on some of those little flowers within that make up the large flower heads.

Step Eight (Above): Edge the panel using a VersaMark inkpad and emboss with Crystal embossing powder. Layer to a larger card blank and edge with a black multi-liner before mounting the cut out leaves and butterflies. (It was at this stage that I decided I didn't like the pink butterflies that I had previously painted so I painted two more butterflies in South Pacific and Inky Pool with pink and yellow accents and mounted those instead! Lastly add accents of Crystal glitter glue.

This photo (above) shows how the Crystal embossing, the Crystal glitter glue and the Pearl Glaze really catch the light.


I hope that my step outs over the last few days have helped you to see how I go about building up my layers and creating my projects! All of this takes an enormous amount of time, with stopping to take the photos, then uploading and editing them and finally doing the blog post itself (and time is something that I don't tend to have a lot of!!) but I do so hope that for those of you who have visited me over the last few days that it has been time well spent!!

Love Kay xx

Facebook: https://www.facebook.com/kaycarley.designer/
Twitter: https://twitter.com/carleycards
Instagram: https://www.instagram.com/kay.carley/
Pinterest: https://uk.pinterest.com/kaycwilson1/